Custom Application Interfaces
Overview
The DMC has the ability to display a custom web-based interface for a Dome model. These must be defined as Handlebars templates. The template will be displayed within a <div> element embedded in the DMC page for running a service.
Both an input and an output template are allowed for a Dome model. The input template is the welcome page to your dome model. It will be displayed before the model is run, and allows the user to enter all the input values for the Dome model. The output template is displayed after the Dome model has completed and displays the output values of the Dome model. The DMC will display the custom interface instead of the default interface when running a service based on the availability of two Dome variables: inputTemplate and outputTemplate. This ability is not available for testing within the standalone Dome client, but must be run through the DMC to render a webpage.
To define an input or output template, create a string variable named inputTemplate or outputTemplate respectively. The DMC will detect the existence of the variable and will interpret the value as a handlebars template, and display it instead of the default input/output page when your model is run.
Defining an input template
An input template must allow the user to define all inputs needed for the dome model, and have a way for the user to run the model. To run a model, call the run() function. Here is the code for an example run button.
<button ng-click="run()">Run</button>
To pass input variables into the DMC/Dome, give the element an id that matches the dome variable name. For example, the tag below will create a textbox which will be used as the input to the Dome variable inputName.
<input type="text" id="inputName"></input>
Defining an output template
The output template can be generated dynamically by your Dome model. It is simply another output variable of your Dome model. The DMC will populate the template by matching the Dome variable names to the handlebars variable names once the model has completed running. All output variables can be displayed in the template by referencing the variable name wrapped in {{}} as shown below. This embeds the value of the Dome variable outputMsg in the output template.
<div>{{outputMsg}}</div>
Hello World Dome model with custom web interface
Below are step-by-step instructions to build a simple Dome model with a custom web interface.
Open the Dome client.
Select ‘Build’ from the dropdown menu at the right hand corner.
From the menu select Build->New Model->Dome Model
From the menu select Add->Procedural Relation
Add variables
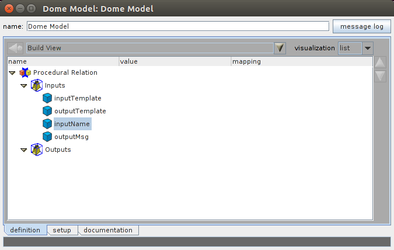
Highlight the Procedural Relation, then from the menu select Add->String. A variable will be added under the Inputs. Repeat until you have 4 variables.
Double click on the variable name ‘StringParameter’ and change it to inputTemplate (case-sensitive). Rename the other variables: outputTemplate, inputName, and outputMsg. Don’t worry that the variables are listed under Inputs for the moment.
Setup causality:
Double click on the icon next to Procedural Relation. This will open a new window.
Click on the Causality tab.
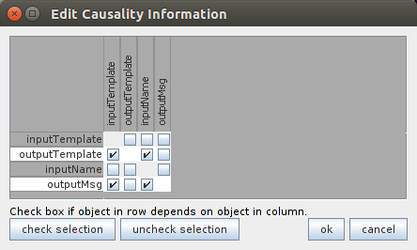
Click the Edit Causality Information button.
Update the causality to match what is shown below. Click OK to close the Edit Causality Information window.
Define the default input variable values:
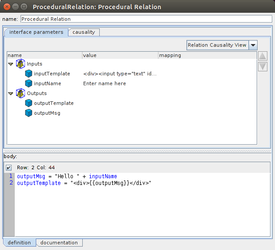
Click on the "interface parameters" tab in the ProceduralRelation window.
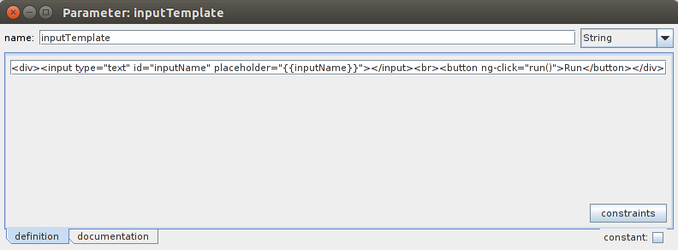
Double click the cube next to the inputTemplate. This opens a window to enter a default value for the variable. The text entered here is the text that will be interpreted as a handlebars template and displayed to the user as the welcome page to your Dome model. It defines a textbox that will input to the Dome variable inputName. The value of the placeholder text is set to the default value of the inputName variable. Then it creates a button to let the user run the model. Enter the following text in as the value, then close the window.
<div><input type="text" id="inputName" placeholder="{{inputName}}"></input><br><button ng-click="run()">Run</button></div>
Double click the cube next to inputName. Add the text "Enter name here" and close the window. The default value will be populated into the the input template and displayed to the user.
In the body of the Procedural Relation window, add the following text. This is python code that creates a string in the outputMsg variable. It then defines the outputTemplate to read in the value of the outputMsg variable and display it to the user. Whatever is populated into the outputTemplate variable at the end of running the model will be used as the handlebars output template that is shown to the user.
outputMsg = "Hello " + inputName
outputTemplate = "<div>{{outputMsg}}</div>"
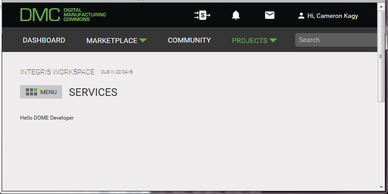
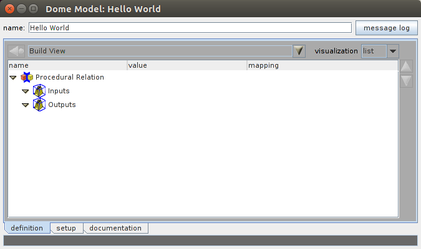
Save the Dome model and deploy the model to the DMC (as described in other tutorials). Register the service and click Run. The model should appear as below:
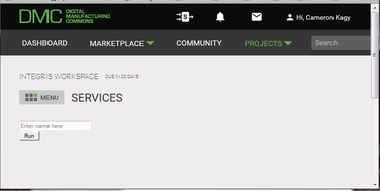
Enter a name such as "Dome Developer" and click the Run button. Your model will run and display the output template as shown below.