Automation Framework Design
Opening an Existing Maven Project
In order to load the dmcqa repository or an existing selenium code into Eclipse, take the following steps.
- Use Git to pull down the dmcqa repository
- If you have enabled SSH with your GitHub account you can use the following terminal command
- git clone git@github.com:dmc-uilabs/dmcqa.git
- If you have enabled SSH with your GitHub account you can use the following terminal command
- Open the Eclipse program
- In the package explorer right click in the whitespace and choose import from the list
- In the new window double click on: Maven
- Double click on Existing Maven Projects
- In the next window click on the browse button
- Navigate to the root of the dmcQA project folder in the dmcqa repository in the file explorer and click on the ok button in the file explorer
- Check the box next to the /pom.xml under Projects and click on the finish button
- The process is complete. You should now be able to run any tests that have been written and update the code as well.
Creation of Maven Project
To create a Maven project for automation testing type the following command in the command prompt.
	- mvn archetype:generate -DgroupId=PacageName -DartifactId=ProjectName -DarchetypeArtifactId=maven-archetype-quickstart -DinteractiveMode=false
To connect the Maven project to eclipse go to the root of project in command line and type the following command.
	- mvn eclipse:eclipse
To compile maven project
	- mvn compile
To run maven project
	- mvn test
To import project into Eclipse go to File, Import, and click on General. Choose existing projects into workspace or select Maven and click add existing maven project. Click Next, browse, navigate to the root of project, hit enter and Finish. The project is now configured in the Eclipse editor. The next step is to add dependencies to the pom.xml file. It is center of a Maven project, all library dependencies must be declared here for the project to run without any errors.
Dependency List:
Note: Each library is wrapped in a <dependency></dependency> tag and all must be in one single tag called <dependencies></dependencies>
Data Driven Input
Retrieving information from a file rather than hardcoding is vital to framework design. Thus, to create a data properties file go to New, Other, General, File and name it data.properties. To connect the data properties file with base file include the following code:
FileInputStream f = new FileInputStream(“Put the path of the data.propeties file here”);
prop.load(f);
String broweserName = prop.getProperty(“browser”);
Converting Framework into TestNG and configuring TestNG xml file
Right click on root of project, choose TestNG, convert to TestNG, next, and finish. To integrate the TestNG xml file details into the pom.xml file you will need to use the suite xml files. Add the following code into the pom.xml file.
<build>
  <plugins>
      <plugin>
        <groupId>org.apache.maven.plugins</groupId>
        <artifactId>maven-surefire-plugin</artifactId>
        <version>2.20</version>
        <configuration>
          <suiteXmlFiles>
            <suiteXmlFile>testng.xml</suiteXmlFile>
          </suiteXmlFiles>
        </configuration>
      </plugin>
  </plugins>
</build>
Log4j API for Logging inside Framework
To use Log4j you will need to add it's dependency listed above. Next add a log4j.xml file to the project that will drive the logs execution and state the path of the log4j file in the pom.xml. Once that is done to start logging include
Public static Logger log = LogManager.getLogger(base.class.getName()) in every test case.
Add the below code to the log4j.xml file:
Add the below code to the pom.xml :
<resources>
	<resource>
	 <directory>src/main/java/resources</directory>
	 <filtering>true</filtering>
	</resource>
</resources>
Screenshot on Failure
To implement the ability of screenshots on failure you will need to add a TestNG listners file. The file will excute a command when an test fails.
In the base class add the following code:
Now create a listners file in the test case folder and add the following code:
Finally, give the path of the listners class file in the testing.xml file for proper execution.
<suite name="Suite">
	<listeners>
		<listener class-name="dmcqa.listeners"/>
	</listeners>
</suite>
Extent Reports
To enable extent reporting functionality add the maven dependency listed above to the pom.xml file.
Create an class titled ExtentReporterNG and add the following code for TestNG Reporter:
Now give the path of the ExtentReporterNG class file in the testing.xml file for proper execution
<suite name="Suite">
	<listeners>
		<listener class-name="resources.ExtentReporterNG"/>
	</listeners>
</suite>
Configure Test Cases
For automation tests to run the test cases must be decleared in the testing.xml file. Each test will have it's own <test> tag and using the <classes> and <class> tags declare the package name and class name.
<test name="Test">
    <classes>
      <class name="packageName.ClassName"/>
    </classes>
</test> <!-- Test -->
Project Contents
Below is a brief description of the project contents.
- Src/test/java - all test case files go here
- Src/main/java - all utilities, page object files, data, and base files go here
- pom.xml - all library dependence’s must go here
- testing.xml - all test cases must be declared here
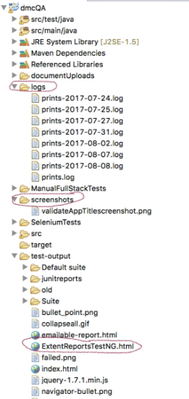
- logs - folder includes all print logs
- target/surefire-reports - extent reports will generate here
Selenium Workflow
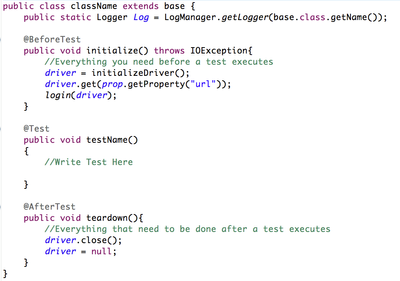
To create Selenium test cases, start creating the class files under src/test/java folder. For each test use the Before, Test, and After annotations. Before every test initialize the driver, navigate to the desired url, and login to the website. The actual testing will happen using the Test annotation. Every test will have it's own Test annotation. Use the After annotation to close the browser and set the driver to null after every test case. Include the Logger declaration in every test file to use Log4j functionality.
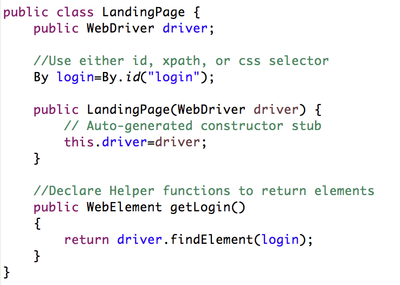
Every test case will need access to UI elements such as inputs, text boxes, user menu, or navigation and tab bars. Declare any page objects under the pageObjects package in the src/main/java folder. This will insure readability and easy access when changes are required.
To run test cases from the command prompt refer to the Configure Test Cases section above.
Once the project is run from the command prompt using the Maven commands, the results can be seen through a variety of ways. Print log reports will be generated under the logs folder, screen shots will be generated when a test fails under the screenshots folder. To view the extent reporting access the ExtentReportsTestNG.hmtl file under the test-output folder
Jenkins Continuous Integration Server
Download Jenkins: https://jenkins.io/
Jenkins Command to start initialization:
- java -jar jenkins.war -httpPort=8080
Configure Jenkins:
To configure Jenkins navigate to Mange Jenkins and click on Configure System. Now add the JDK and Maven dependencies by giving the path.
Creating a Jenkins Project
To create a Jenkings Project click on New Item and give the name. Select Maven Procject and click the okay button. Under Build, click on add build step, invoke maven, and select the maven version. Under targets type "compile test" and under build file give the path of the pom.xml and save.
To schdule test cases.
Under build triggers click build periodically and give a scheduled time using the pattern following the order of minutes, hours, day, month, and year.
Example Schedule:
To schedule your build every 5 minutes, this will do the job: */5 * * * *
To schedule your build every day at 8h00, this will do the job: 0 8 * * *
Note: Stating the * means daily.
Running Jenkins Project:
To run a Jenkins porject Click on Build Now. Then click Console Output to view the results of the auotmation testing.